
Our First Experience Replacing Our Motorhome's House Battery Bank:
Video: RV Tips: Changing Our Motorhome's House Batteries
This post contains affiliate links. Please see our disclosure for more information.
Part of RV ownership is maintenance. In this video, we replace our motorhome's 4 house batteries and talk about some things we've learned about battery maintenance. We hope that you can learn from our mistakes to get the most out of your RV's battery life. We replaced 4 6-volt golf cart batteries with 4 new 6-volt golf cart batteries. We did a lot of research to decide what batteries to buy and we learned a few things along the way.
Tips for Replacing Your RV's House Batteries
Study Your Battery Bank Before You Start! Before you begin removing your old house batteries, be sure that you take pictures of the compartment so that you can see how everything is connected. Some RV battery bays are pretty tight and it can be difficult to see everything in the back, so be sure to snap some photos in the back of the bay as well. We'd also suggest drawing a simple diagram to remind you of how the batteries are positioned, where the positive and negative terminals are located and which cables connect to what so that you can be sure all of your cables will reach what they need to.
Decide What Type of Battery is Right For You There are three main types of batteries used for RV house batteries: traditional lead acid (also called flooded cell batteries), AGM (which stands for Absorbed Glass Mat or sometimes Absorbent Glass Mat depending on where you look), and Lithium. The type of batteries you choose can be based on price, space, power needs and how you use your RV. Whichever you decide to go with, all of your batteries should be the same type, size and age. Be consistent.
Save Money By Recycling Retailers today will charge a "core" fee when you are buying batteries. This is a recycling fee that is placed on every battery. We avoided this fee by giving them our old batteries when we bought the new ones.
Not All Batteries Are Created Equal Do your research ahead of time to determine what will be right for your needs. RV House Batteries are available in 6-volt and 12-volt and in a wide variety of amperages. Know what you currently have and how that works out for you. And spend some time doing some research online to narrow down what you are looking for so you aren't wasting gas running all over town. And remember, 6-volt batteries will be connected differently than 12-volt batteries. So, again, pay close attention to how your batteries are connected.
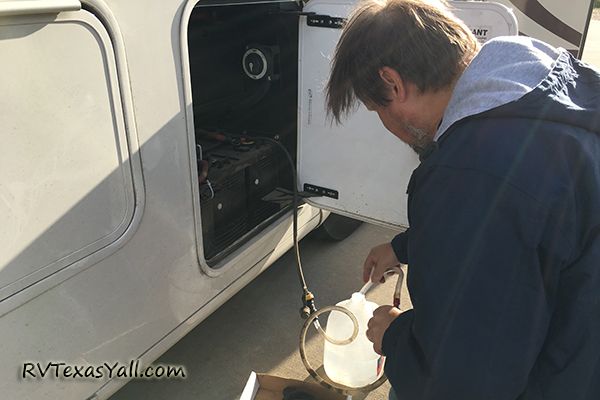
Using Our Battery Quick Fill System to Top Off Our House Batteries
If You Choose Lead Acid Batteries You will need to maintain the level of distilled water in your batteries. This can be a pain in the butt if some of your batteries are difficult to access. Since 2014, we have used a battery quick fill system to easily and quickly add distilled water to our house batteries. The filling tubes stay connected at all times. When it's time to check the water level, we connect the end of that tube to our hand pump which has another tube that we put down into the bottle of distilled water. All we have to do is squeeze the pump a a few times. It tops off all of our house batteries simultaneously and will not allow them to overfill. It is really super simple and we highly recommend it. As long as we have lead acid batteries in our RV, we will use a battery quick fill system! Here's one like ours if you'd like to get one for yourself: Flow-Rite RV2000 RV Edition 2 Battery Kit. (We have 2 of these since we have 4 6-volt house batteries.)
Types of RV House Batteries
Lead Acid Batteries Also called "flooded cell" batteries, lead acid batteries are the least expensive option for replacing the house battery bank in most RVs. They are also the most common type of battery you'll probably find in most campers. The price is nice (especially when you are replacing multiple batteries), but there are a few downsides to lead acid batteries. They require more maintenance than the other types of batteries. As we mentioned above, you have to keep a close eye on the fluid levels of these batteries. Low fluid levels can affect performance and may significantly shorten your battery's life. With the quick fill system we suggest above this is super easy to do, but you have to remember to perform this maintenance regularly.
You also want to keep an eye on the charge level of your lead acid batteries. We've read that allowing the battery charge level to drop below 50% will potentially damage the battery and shorten its life. This isn't a problem when you are plugged into shore power, but be very mindful of your charge levels if you are boondocking and be sure to check on your batteries regularly when your RV is in storage! Lead acid batteries will lose their charge in storage even if you have disconnected them.
AGM Batteries Absorbed Glass Mat batteries are sealed and do not require you to add distilled water. So they require a little less maintenance than lead acid batteries, but they are also more expensive. You still need to monitor your charge levels just like you would with lead acid batteries. Just like their lead acid cousins, AGM batteries will lose their charge in storage even when disconnected.
We've read reports that say that AGM batteries may recharge more quickly than lead acid, but they may also be more sensitive to overcharging. Some articles we read also said that AGMs might be more sensitive to temperature changes than their lead acid counterparts.
Lithium Batteries The newest option (and the technology that seems to be quickly changing at the moment) is lithium. Lithium batteries are a lot more expensive than the other options. Traditionally, they are sized completely differently than most RV house batteries and have been known to be very sensitive to temperature. However, they are lighter in weight (which is always a good thing in RVs!), more powerful, and can use up more of their charge without risking damage to the life of the battery.
We've read that the latest chemistries in lithium batteries for RVs are less sensitive to temperature changes and allow the batteries to maintain their charge in storage for up to a year! When we were doing our research, we came across some new lithium batteries that were sized just like the 6-volt golf cart batteries (GC2) we currently have, so they would have worked easily with our existing battery location and brackets.
Tips for Maintaining Your RV's Batteries
Keep An Eye On the Water Levels We can't stress this one enough! If you have lead acid batteries, like us, then you have to maintain the distilled water levels of your batteries. Start checking those water levels as soon as you buy your RV. Even brand new RVs can have batteries without sufficient water. (Maybe that particular RV has been on the lot for a little while?) Never assume what your RV has been through before you found it. Be consistent about checking the fluid levels and maintain them easily with a Flow-Rite battery quick fill system. (Have we told you how much we love ours? It has saved us a ton of head bumping and unmentionable language over the years!) :)
Use a Trickle Charge If you have access to a standard 110 power plug, you can use a Camco 30amp to 15amp Adapter or a Camco 50amp to 15amp Dogbone Adapter to trickle charge your RV's house batteries while it is in storage. However, do not assume that it is charging just because you have it plugged in. If the power to your storage area fails for any reason, your RV batteries may end up discharging instead of charging. This happened to us twice. So always go back within 24 hours after you plug in to trickle charge to check on your batteries. We've read that your batteries should be fully charged within that 24 hours, so you'll want to unplug them and disconnect them at that point anyway. (especially if you do not have a good energy management system to keep your batteries from overcharging)
Don't Assume Anything We have learned this the hard way! The batteries are the heart of your RV. There is nothing worse than getting ready for a camping trip only to find that your batteries are low or dead. Be proactive in maintaining your batteries and you will never be surprised. This is especially true for part-time or seasonal RVers. Be sure you check on your batteries regularly. Don't assume anything when it comes to them.
Disconnect the Batteries When Not Using or Charging If you are storing your RV, even for a few days, and you will not be trickle charging the batteries, be sure to disconnect them. For our travel trailer, this meant physically disconnecting the battery cable. In our motorhome, it means that we set the inside battery button to "Store" and the chassis battery switch inside our battery bay to "Off". We've also learned to check to make sure the Inverter/Charge Controller is turned off before we set these battery switches. But remember, lead acid and AGM batteries will still lose some of their charge even when they are disconnected. So be sure to come back to check on them at least every couple of weeks.
Use Your RV As Often As Possible! RV batteries like to be used, so try to get out and go camping as often as possible (as if you need another excuse, right?). It's also easier to remember to check and maintain your batteries when you are using it than when it is in storage away from you.
We've certainly made our share of mistakes over the years when it comes to extending the life of our RV's battery bank. Being part-time RVers definitely adds to the challenge since we are not physically in the RV every day. We hope that this helps you to avoid some of our mistakes so that you can get the most out of your RV's batteries!